You may want to sell your old or pass it onto loved one.
In this article I’ll cover how to deregister on all Kindle devices including via the Kindle App. Deregistering can also be done directly on the Amazon website and I’ll show you how to do this as well.
To deregister any Kindle device, follow the steps below:
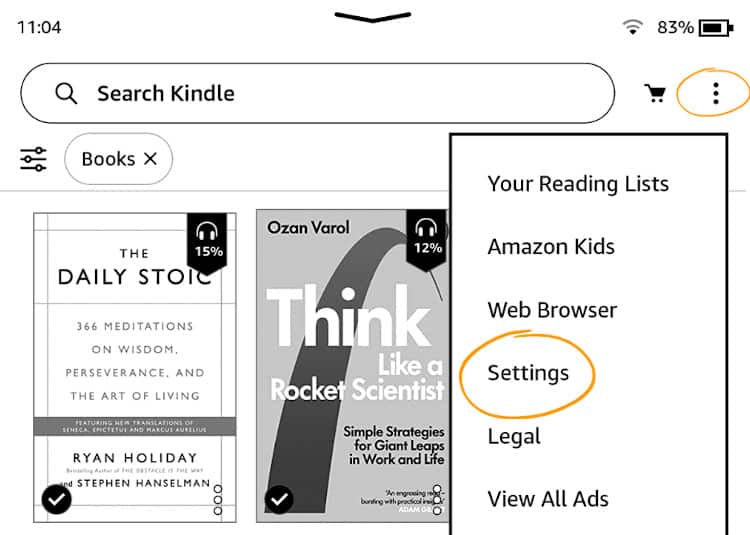
Step 1. Tap the ⋮ icon (top-right) to open the drop-down menu.
Step 2. Tap on Settings.

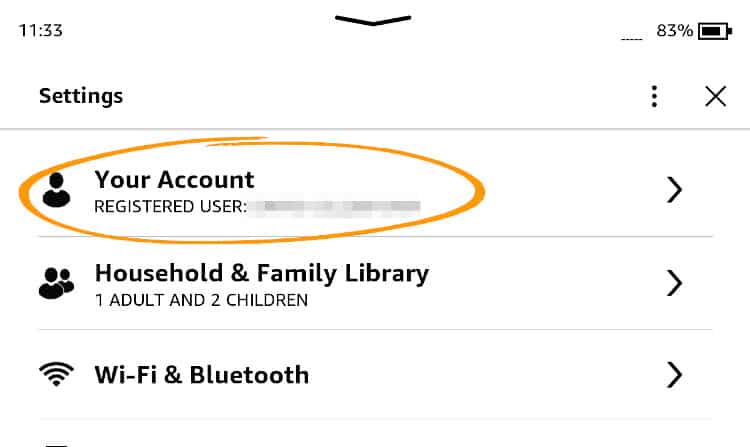
Step 3. Select Your Account.

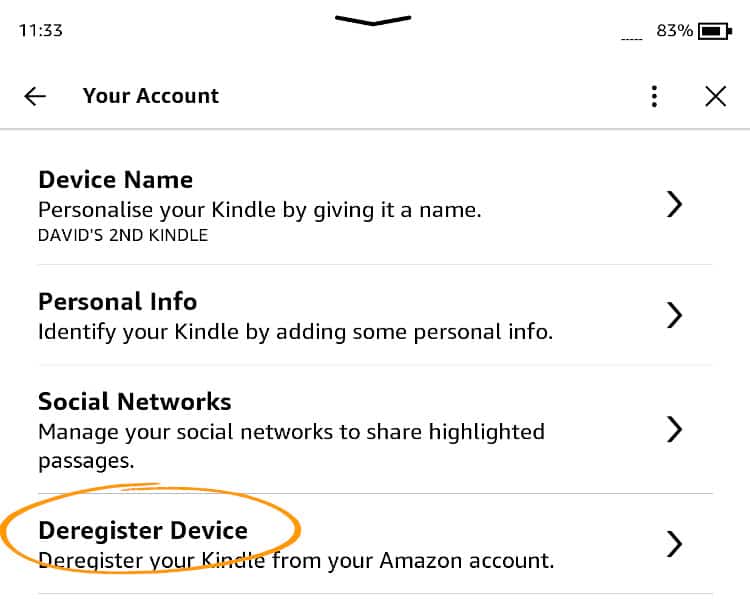
Step 4. Select Deregister Device.

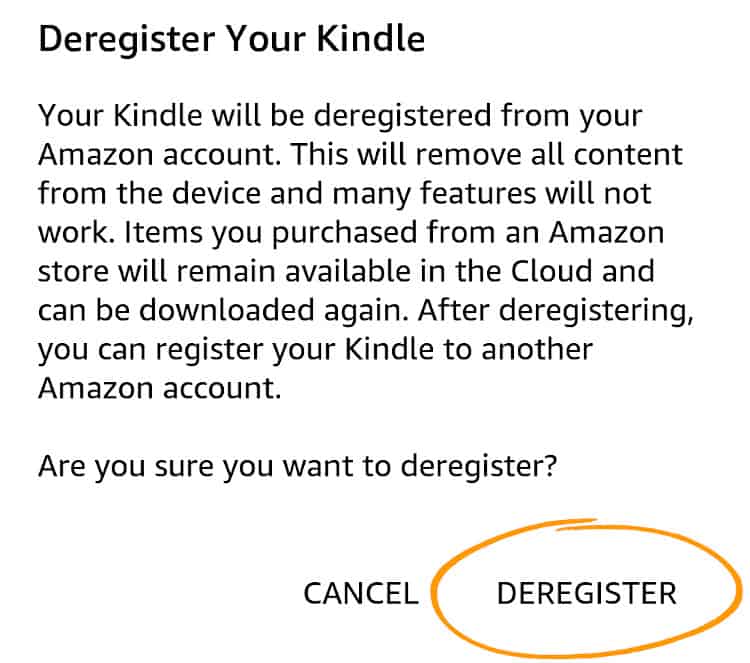
Step 4. Read the disclosure before selecting Deregister.
Be sure to read the disclosure which states that all content on the device will be removed. Once you are happy with this you can continue to de-registering by selecting Deregister.

Your Kindle device is now de-registered.
Deregistering will remove all content related to the account from the device. Many features will also no longer work. However, any documents or PDF’s that you have uploaded to the device manually via USB will still be available.
Only if those ebooks are not connected to your Amazon account i.e. you uploaded them via USB manually. Any ebooks that were purchased through the account you deregistered will be removed. Those books will be restored if you reregister with the same account again.
Deregistering is just as easy on the Kindle App, just follow the instructions below:
1. Tap on More (bottom-right).
2. Select Sign Out.
3. Confirm the notice by selecting Sign Out.
4. You are now deregistered.
You can also deregister a Kindle device using the Amazon App or on the website.
Before you do anything, make sure that your Kindle is connected to the internet otherwise the device will not deregister.
Open the app and tap on the Menu Icon (3 horizontal bars).
Select Your Account.
Scroll down to Content and Devices.
Select the Devices tab.
Select the Kindle Icon and choose which device you want to deregister.
Tap on Deregister.
On the Pop-up window select Deregister again.
Your device will now be deregistered
Deregistering a device on the website is very similar to the app.
Provided you are already signed in you can follow the link which will automatically jump to your Content and devices.
From there, Select the devices tab and select the device you want to deregister.
Now select the Deregister button and on the pop-up window Select Deregister again.
If you have sold your Kindle and want to make sure none of your content can be read by the new owner, I would perform a full reset, sometimes referred to as a factory reset.
You may want to check you have a copy of any content on the device before performing this.
To do this, go to All Settings > Device Options > Reset.
Confirm the action by selecting Reset.
Your device will now be restored to it’s factory default settings and remove all content.
If you are unable to reregister your Kindle, it may be that you do not have an internet connection.
Be sure to check that the WiFi icon is visible at the top-right of the screen and has at least two bars of signal strength. If not, move your device closer to the router to perform this.
Still struggling? Make sure your WiFi is connected to your home network by selecting All Settings > Wi-Fi & Bluetooth.
Below WiFi Networks you should see the following: CONNECTED TO followed by your home WiFi name. If not, try to reconnect and re-enter your password.
For any further assistance Amazon have a guide to registering your Kindle device.
Once you know how deregistering a Kindle is relatively simple and should take less than a minute to do.
If you have any other technical issues, we have a plethora of quick user guides on our site to help troubleshoot any queries you may have with your Kindle.
