One of my favorite aspects of owning a Kindle is the ability to customize the reading experience to my own personal preferences.
From adjusting the screen brightness to selecting the perfect font, my Kindle has become an indispensable reading companion.
In this article, I'll discuss changing the font on your Kindle, making it easier for you to enjoy your ebooks.
As a bonus later on, I’ll show you how to install custom fonts for an even more personalized experience. This has allowed me to further tailor my reading environment, ensuring that I have the best possible experience.
I recently discovered that changing the font on my Kindle is a simple process.
By following a few easy steps below, you too can instantly transform the appearance of the text, making it more visually appealing and easier to read. Not only does this make my reading sessions more enjoyable, but it also allows me to adapt the text to my specific needs or preferences at any time.
As an avid Kindle user myself, it’s essential for me to know how to customize my reading experience.
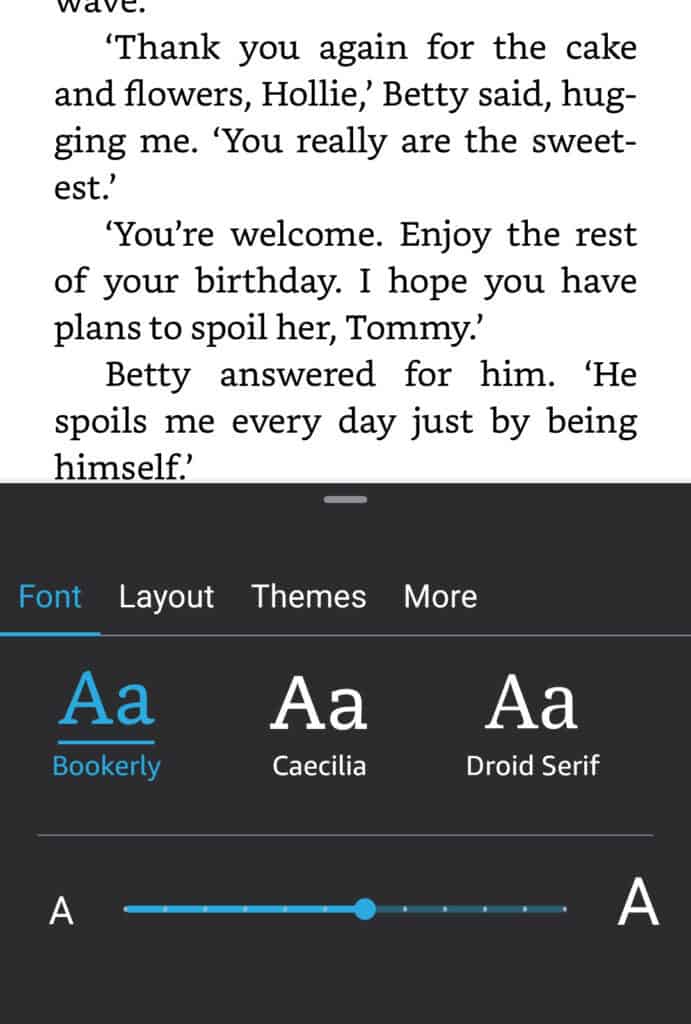
Kindle comes with several built-in fonts to get you. Some of the available font families include: Amazon Ember, Baskerville, Bookerly, Caecilia, Caecilia Condensed, Futura, Helvetica, as well as OpenDyslexic1. As a reader, I can choose the font that is most suitable for me.
The simplest way to change the font size is to zoom in/out, this will adjust the size of the text whilst you have the book open. Alternatively:

At the top of the list is Font Family.
Tap on this and you will given a page of various fonts to choose from. Tap on your desired new font to change the typography.
As you can see the Menu layout on the Kindle app is only slightly different, but you can still use the step-by-step guide previously to make any changes.
To do this on my computer, I first open the book I want to read. Next, I click on the "Aa" icon in the reading toolbar, which opens various font options4. Here, I can choose from several font families, adjust the text size, and select my preferred settings to enhance my reading experience.
You can also customize the layout further by adjusting the line spacing, and margins.
This allows me to choose how much space there is between lines of text, which can greatly improve readability.
To change the line spacing on your Kindle, simply open the book you are reading, and tap on the screen to reveal the "Aa" icon. Tapping this will open the Display Settings menu, where you can select your desired line spacing.
On Display Settings you can easily adjust the margins so that the text either spans across the entire screen or has ample white space on either side.
While adjusting these settings may seem like a small detail, I have found that customizing to my personal preferences has made a noticeable difference in my overall reading enjoyment. Whether it's through the Kindle app or on a dedicated Kindle device, these adjustments can transform your reading experience into a comfortable and enjoyable one.
On the newer Kindle models such as the Kindle Paperwhite 2019 and Kindle Scribe, we can add our own custom fonts!
Again, this is a lot more straightforward than you think, so don’t be put off as I’ll go through this step-by-step.
Then, I connected my Kindle to my computer using a USB cable. I opened the Kindle's root directory and located the "fonts" folder. If it doesn't already exist, I created a new folder named "Fonts."
Next, I simply copied the desired font files from my computer to this "fonts" folder on my Kindle. Once the files were transferred, I safely ejected my Kindle and disconnected the USB cable.
After that, I opened a book on my Kindle, tapped on Page Display, and accessed "Font & Page Settings." At this point, I could see my custom fonts available for selection under the "Custom" tag.
The process on is very much the same but with a slight variation.
To manage my custom fonts, I installed a file manager app from the Amazon Appstore. With this app, I navigated to the "Download" folder and located the font files I had previously saved.
I then created a new folder called "fonts" in the root directory of my Kindle Fire and moved the font files to this new folder.
Now, to apply my custom fonts while reading, I simply opened a book in the Kindle app, tapped "Aa" to access the font settings, and then selected "Custom" to see the list of available custom fonts. I chose the desired font, and my new custom font was displayed.
I can’t tell you how satisfying it is when you successfully upload a font of your own, you just have to try it!
Since firmware 5.9.6, Kindle e-ink devices have supported custom fonts. So, if you have a Kindle Paperwhite 2 or later and the device firmware is up to date, I can upload TrueType (TTF), OpenType (OTF), or TrueType Collection (TTC) fonts to my Kindle to customize further. Some popular custom fonts include OpenDyslexic and Palatino.
For Kindle Fire tablets, the process of exploring font choices is slightly different. While reading a book, you need to tap the centre of the screen, and then tap the "Aa" button near the top right corner. Similar to e-ink devices, you can choose from various pre-installed fonts such as Bookerly, Caecilia, or Amazon Ember.
In addition to these default fonts, Kindle Fire tablets support custom fonts, allowing you to install and use TTF, OTF, or TTC font files if I want to further personalize your reading experience.
The Kindle app offers fewer pre-installed font choices compared to e-ink devices and Kindle Fire tablets, pre-installed fonts, including Bookerly, Caecilia, and Amazon Ember are available though. However, there are still plenty of options to ensure you can find a font that suits your needs.